How to Compress a Video Online Free Without Losing Quality
Compression always trades some quality for size, the trick is making that loss invisible. Here's how to shrink a video online for free without the blocky, smeared result.
Your video is too big. Maybe an upload form rejected it, maybe it won't attach to an email, maybe your phone's storage warning won't stop popping up. You want it smaller, but you don't want it to come out the other side looking like a blurry, blocky mess. That's a completely reasonable thing to want, and it's also more achievable than most "free video compressor" results make it look, as long as you understand what compression is actually doing before you start dragging sliders around.
What "without losing quality" really means
Every lossy video compressor throws away information. There's no setting anywhere that makes a file smaller for free with zero data loss, that's what "lossy" means. What separates a good compression job from a bad one isn't whether quality was lost, it's whether you can actually see it.
A video's file size comes mostly from its bitrate, how much data it uses per second of footage. Cut the bitrate a little and the compressor just gets pickier about which fine details to keep, discarding things your eye barely registers anyway, like subtle noise in a flat sky or slight texture in fabric. Cut it a lot and you start seeing the damage directly: blocky squares in dark scenes, smeared motion, banding in gradients. The resolution and frame rate usually don't need to change at all for a moderate size reduction. They only need to come down when you're chasing a genuinely small target, like a hard 10 MB cap for a Discord upload, and quality reduction alone can't get you there without visible damage.
That's the real goal here: cut the bitrate as far as you can before the damage becomes visible, not as far as possible.
1. AI Convertly's compress video tool (browser-based, no upload, no account)
- Open the compress video tool.
- Drop your video onto the upload area, or click it to browse. It reads MP4, WebM, MOV, and MKV files.
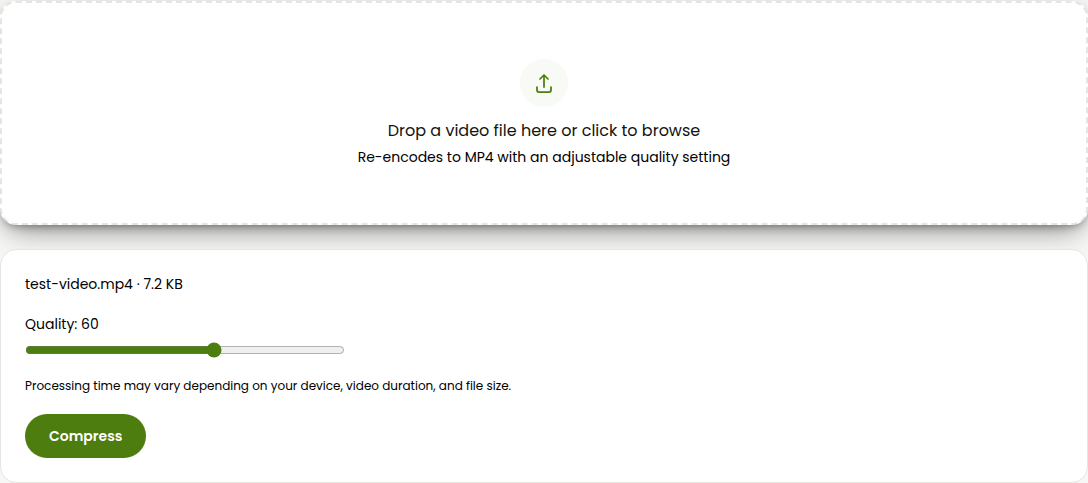
- Drag the Quality slider. It runs from 1 to 100 and starts at 60, a reasonable middle ground. Lower means a smaller file with more visible compression, higher keeps more quality but saves less space. Behind the scenes this slider is adjusting the encoder's CRF value, the same setting desktop tools like HandBrake expose directly, just simplified into one number.
- Click Compress and let it process. Everything runs inside your browser using your device's own processing power, so a longer clip or a higher resolution takes longer, and nothing uploads to a server while you wait.
- When it finishes, the result panel shows your original size next to the new one, plus the percentage saved, so you can see exactly what you got before downloading. If it's not small enough yet, or the drop in quality is more visible than you'd like, adjust the slider and run it again.
- Click Download.
Two honest limits worth knowing going in. First, this tool always re-encodes to MP4, regardless of what you upload, so if you specifically need to keep a WebM or MOV container, compress first and convert after (or use the video converter instead). Second, because it's running entirely on your device rather than a server, files over roughly 200 MB can take a while and use a fair amount of memory, since your browser is doing the encoding work a data center would otherwise do. For most single video files this isn't an issue, but a long 4K screen recording might ask more of your laptop than you'd expect. There's no watermark, no sign-up, and no daily limit either way, since the processing cost sits on your device instead of a server AI Convertly has to pay for.
2. FreeConvert (general online compressor, up to 1GB free)
If you need a size or bitrate target the slider above doesn't give you, or your file is bigger than what a browser tab can comfortably chew through, a server-side compressor is the next step. FreeConvert is a solid general-purpose option: no account needed, no watermark on the result, and it accepts files up to 1GB on the free tier.
- Go to FreeConvert's video compressor page and upload your file.

- Pick how you want to target the reduction: a percentage of the original size, a specific quality level, a maximum bitrate, or new dimensions. Quality level is the closest match to "smaller without visible damage."

- It also lets you switch the output codec to H.265 instead of H.264. H.265 compresses noticeably better at the same visual quality, FreeConvert's own numbers put it at 20 to 75% smaller, but it has spottier hardware support on older phones and TVs, so it's worth confirming your destination device actually plays H.265 before relying on it.

- Click Compress Now and wait for the progress bar to finish uploading and processing.

- Download the result once it's ready.

The catch, and it's true of basically every server-side compressor, is that your file has to leave your device and sit on someone else's server for however long processing takes. Fine for an occasional file, worth remembering if what you're compressing is sensitive. Some competitors in this space, Clideo among them, also stamp a watermark onto free exports unless you pay, so it's worth checking that before you commit to one for a file you actually need clean.
3. Native software: QuickTime on Mac, Clipchamp on Windows
If you're not trying to install anything new, both major operating systems ship something that can shrink a video already.
On a Mac, with QuickTime Player
- Open the video in QuickTime Player (right-click the file, choose Open With, then QuickTime Player).
- Go to File, then Export As.
- Pick a resolution. Dropping from 1080p to 720p cuts the file size substantially with a loss that's mild on most screens; go lower only if you need to.
- For 4K or 1080p exports, a Format menu appears, choose Smaller File Size (this switches the export to HEVC/H.265) instead of Greater Compatibility.
- Choose a save location and click Save.
On Windows, with Clipchamp
Clipchamp comes preinstalled on Windows 11 (search for it in the Start menu) and, despite being a full editor, works fine for just shrinking a file you don't need to actually edit.
- Open Clipchamp and start a new project with your video imported.
- Drop it straight onto the timeline with no edits.
- Click Export in the top right.
- Choose a resolution. The free tier caps out at 1080p, which is plenty for a file that's already 1080p or smaller.
- Click Export again and save the file once it finishes.
Neither of these gives you the direct bitrate or CRF control a browser compressor or HandBrake does, you're mostly trading resolution and container defaults for a smaller file, but if you've already got the app open, it's a reasonable option.
4. HandBrake, when you want direct control over the trade-off
For the most control over exactly how much quality gets traded for size, HandBrake's Video tab exposes a Constant Quality slider set in raw CRF values, roughly 18 to 23 for what most people would call visually lossless, climbing from there as the file gets smaller and the compression more obvious. It's overkill for a single quick file (there's a full walkthrough of when HandBrake is and isn't worth installing in the HandBrake alternative guide), but if you're compressing regularly, want to save a preset, or need to batch a whole folder of clips at once, it's the one tool here built specifically for getting that trade-off exactly right rather than approximately right.
Which one should you actually use
For a single file and a normal "just make this smaller" goal, the browser tool is the fastest path and keeps the file off a server entirely. If you need a harder size target, a specific bitrate, or the H.265 codec's better compression, FreeConvert covers that without a watermark. If you already have QuickTime or Clipchamp open for something else, they'll get you most of the way there without installing anything. And if you're doing this often enough that CRF values and batch queues start sounding useful instead of intimidating, that's when HandBrake earns the install.
Compress Video
Shrink a video's file size while keeping quality reasonable.